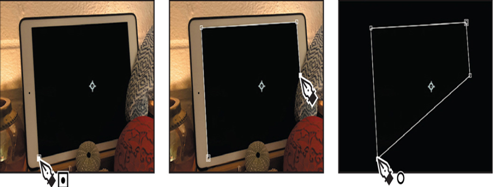
The tablet screen is currently blank. To fill it with the video of a sea turtle, you need to mask the screen.
Tip
You can also create a mask using the Mocha effect. To learn more about using the Mocha effect, see After Effects Help.
- Go to 2:00, where the video is in full color.
- Make sure the TabletVideo.mov layer is selected in the Timeline panel, and then select the Pen tool (
) in the Tools panel.

The Pen tool creates straight lines or curved segments. The tablet screen itself is rectangular, so you’ll try using straight lines first.
- Click the lower left corner of the tablet screen to place the first vertex.
- Click the upper left corner of the tablet screen to place the second vertex. After Effects connects the two points with a segment.
- Click to place a third vertex in the upper right corner of the tablet screen, and then click to place a fourth vertex where the fabric intersects with the right edge of the screen.
- Move the Pen tool over the first vertex you created (in the lower left corner). When a circle appears next to the pointer (as in the image on the right below), click to close the mask path.

Tips for creating masks
If you have worked with Adobe Illustrator or Photoshop, or similar applications, you’re probably familiar with masks and Bezier curves. If not, here are a few additional tips to help you create them effectively:
- Use as few vertices as possible.
- You can close a mask by clicking the starting vertex. To open a closed mask, click a mask segment, choose Layer > Mask And Shape Path, and deselect Closed.
- To add points to an open path, press Ctrl (Windows) or Command (macOS), and click the last point on the path with the Pen tool. When the point is selected, you can continue adding points.
About mask modes
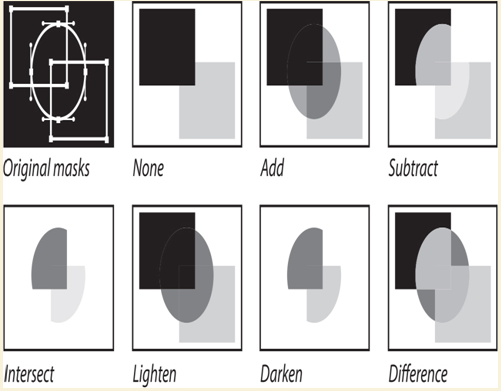
Blending modes for masks (mask modes) control how masks within a layer interact with one another. By default, all masks are set to Add, which combines the transparency values of any masks that overlap on the same layer. You can apply one mode to each mask, but you cannot change a mask’s mode over time.
The first mask you create interacts with the layer’s alpha channel. If that channel doesn’t define the entire image as opaque, then the mask interacts with the layer frame. Each additional mask that you create interacts with masks located above it in the Timeline panel. The results of mask modes vary depending on the modes set for the masks higher up in the Timeline panel. You can use mask modes only between masks in the same layer. Using mask modes, you can create complex mask shapes with multiple transparent areas. For example, you can set a mask mode that combines masks and sets the opaque area to the regions where the masks intersect.

Editing a mask
Instead of masking the information inside the tablet, the mask has removed everything outside the tablet. You need to invert the mask. You’ll also use Bezier curves to create a more accurate mask.
