Creating a mask with the Pen tool – Working with Masks

The tablet screen is currently blank. To fill it with the video of a sea turtle, you need to mask the screen.

Tip

You can also create a mask using the Mocha effect. To learn more about using the Mocha effect, see After Effects Help.

  1. Go to 2:00, where the video is in full color.
  2. Make sure the TabletVideo.mov layer is selected in the Timeline panel, and then select the Pen tool (Pen tool icon) in the Tools panel.

The Pen tool creates straight lines or curved segments. The tablet screen itself is rectangular, so you’ll try using straight lines first.

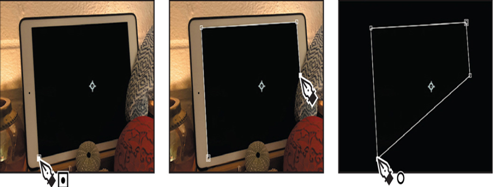
  1. Click the lower left corner of the tablet screen to place the first vertex.
  2. Click the upper left corner of the tablet screen to place the second vertex. After Effects connects the two points with a segment.
  3. Click to place a third vertex in the upper right corner of the tablet screen, and then click to place a fourth vertex where the fabric intersects with the right edge of the screen.
  4. Move the Pen tool over the first vertex you created (in the lower left corner). When a circle appears next to the pointer (as in the image on the right below), click to close the mask path.

Tips for creating masks

If you have worked with Adobe Illustrator or Photoshop, or similar applications, you’re probably familiar with masks and Bezier curves. If not, here are a few additional tips to help you create them effectively:

  • Use as few vertices as possible.
  • You can close a mask by clicking the starting vertex. To open a closed mask, click a mask segment, choose Layer > Mask And Shape Path, and deselect Closed.
  • To add points to an open path, press Ctrl (Windows) or Command (macOS), and click the last point on the path with the Pen tool. When the point is selected, you can continue adding points.

About mask modes

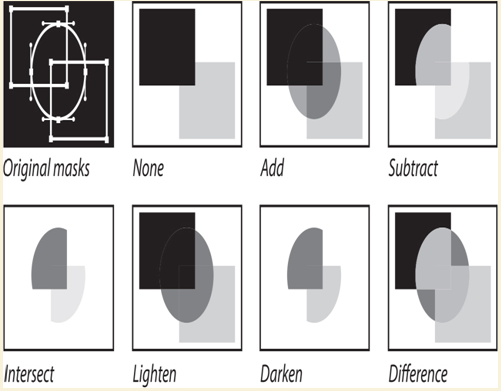
Blending modes for masks (mask modes) control how masks within a layer interact with one another. By default, all masks are set to Add, which combines the transparency values of any masks that overlap on the same layer. You can apply one mode to each mask, but you cannot change a mask’s mode over time.

The first mask you create interacts with the layer’s alpha channel. If that channel doesn’t define the entire image as opaque, then the mask interacts with the layer frame. Each additional mask that you create interacts with masks located above it in the Timeline panel. The results of mask modes vary depending on the modes set for the masks higher up in the Timeline panel. You can use mask modes only between masks in the same layer. Using mask modes, you can create complex mask shapes with multiple transparent areas. For example, you can set a mask mode that combines masks and sets the opaque area to the regions where the masks intersect.

Editing a mask

Instead of masking the information inside the tablet, the mask has removed everything outside the tablet. You need to invert the mask. You’ll also use Bezier curves to create a more accurate mask.

Getting started – Working with Masks

In this lesson, you will create a mask for the screen of a tablet and replace the screen’s original content with a movie. Then you’ll adjust the positioning of the new footage so that it fits the perspective of the shot. Finally, you’ll polish the scene by adding a shadow and creating a vignette effect.
Begin by previewing the movie and setting up the project.

  1. Make sure the following files are in the Lessons/Lesson07 folder on your hard disk, or download them from peachpit.com now:
    • In the Assets folder: SeaTurtle.mov, TabletVideo.mov
    • In the Sample_Movie folder: Lesson07.mp4
  2. Open and play the Lesson07.mp4 sample movie in Windows Movies & TV or QuickTime Player to see what you will create in this lesson. When you are done, close Windows Movies & TV or QuickTime Player. You may delete the sample movie from your hard disk if you have limited storage space.
    When you begin the lesson, restore the default application settings for After Effects. See “Restoring default preferences” on page 3.
  3. Start After Effects, and then immediately hold down Ctrl+Alt+Shift (Windows) or Command+Option+Shift (macOS) to restore default preferences settings. In the Startup Repair Options dialog box, click Reset Preferences. Then, click New Project in the Home window.
    After Effects opens to display a new, untitled project.
  4. Choose File > Save As > Save As, and navigate to the Lessons/Lesson07/Finished_Project folder.
  5. Name the project Lesson07_Finished.aep, and then click Save.

Creating the composition
You’ll import two footage items for this exercise. Then, you’ll create the composition based on the aspect ratio and duration of one of the footage items.

  1. Double-click an empty area of the Project panel to open the Import File dialog box.
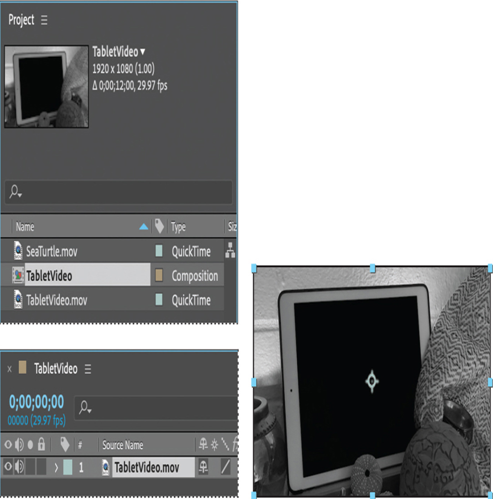
  2. Navigate to the Lessons/Lesson07/Assets folder, Shift-click to select the SeaTurtle.mov and TabletVideo.mov files, and then click Import or Open.
  3. Deselect both files in the Project panel. Then select the TabletVideo.mov footage item, and drag it onto the Create A New Composition button ( ) at the bottom of the Project panel.

After Effects creates a composition named TabletVideo and opens it in the Composition and Timeline panels.

  1. Choose File > Save to save your work so far.

Adding Easy Ease – Animating Layers

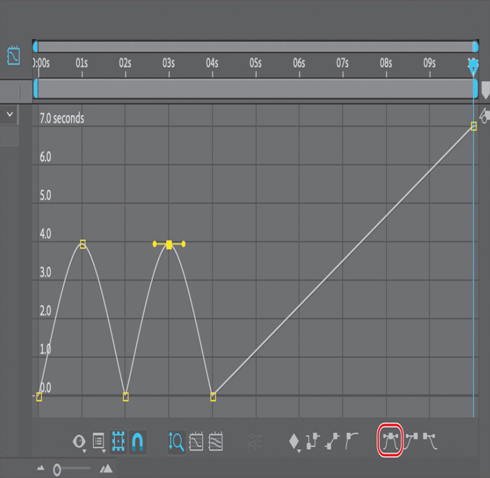
You’ll soften the shift in time that occurs when the lights blink with Easy Ease.

  1. Click to select the keyframe at 1:00, and then click the Easy Ease icon (Easy Ease icon) at the bottom of the Graph Editor. This slows the shift into reverse so that the lights stay bright just a little longer.
  2. Click to select the keyframe at 3:00, and apply Easy Ease for the same effect.

Notice that there are Bezier handles where you added ease. You can refine the amount of ease on a transition further by dragging the Bezier handle. If you drag the handle further from the keyframe, the transition is softer; if you drag it down or closer to the keyframe, the transition is more pronounced.

  1. Go to the beginning of the time ruler, and preview the entire movie.
  1. Choose File > Save to save the final project.

Congratulations. You’ve completed a complex animation, including shifts in time. You can render and export the time-remap project if you’d like. See Lesson 15, “Rendering and Outputting,” for detailed instructions on rendering and exporting a composition.

Review questions
1 Why would you import a layered Photoshop file as a composition?
2 What is the pick whip, and how do you use it?
3 What is a track matte, and how do you use it?
4 How do you remap time in After Effects?

Review answers

1 When you import a layered Photoshop file into After Effects as a composition, After Effects preserves the layer order, transparency data, and layer styles from the source Photoshop document. It also preserves other features, such as adjustment layers and type.

2 The pick whip creates expressions that link the values of one property or effect to another layer. The pick whip is also a way to create parenting relationships. To use the pick whip, simply drag the pick whip icon from one property to another.

3 When you want one layer to show through a hole in another layer, you can use a track matte. To create a track matte, you need two layers: one to act as a matte, and another to fill the hole in the matte. You can animate either the track matte layer or the fill layer. When you animate the track matte layer, you create a traveling matte.

4 There are several ways to remap time in After Effects. Time remapping lets you dynamically speed up, slow down, stop, or reverse footage. When remapping time, you can use the values in the time-remap graph in the Graph Editor to determine and control which frame of the movie plays at which point in time. When you enable time remapping for a layer, After Effects adds a Time Remap keyframe at the start and end points of the layer. By setting additional Time Remap keyframes, you can create complex motion effects. Every time you add a Time Remap keyframe, you create another point at which you can change the playback speed or direction.

Remapping time – Animating Layers

You’re ready to manipulate the speed and direction of time in your project.

  1. With the Pre-comp 1 layer selected in the Timeline panel, choose Layer > Time > Enable Time Remapping.

After Effects adds two keyframes, at the first and last frames of the layer, visible in the time ruler. A Time Remap property also appears under the layer name in the Timeline panel; this property lets you control which frame is displayed at a given point in time.

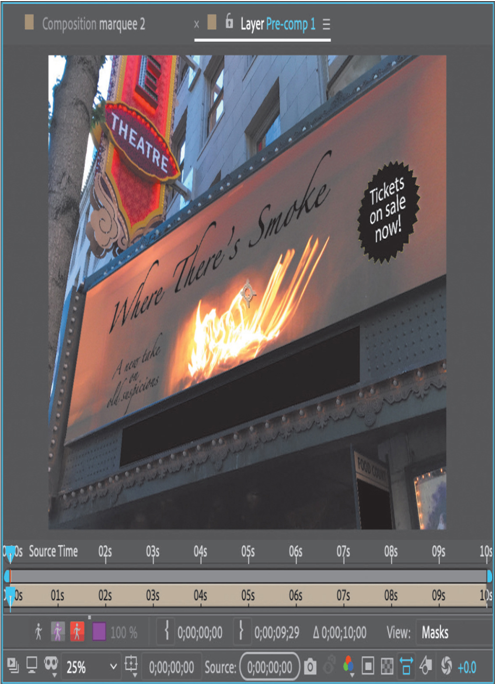
  1. With the Pre-comp 1 layer active, choose Layer > Open Layer to open it in the Layer panel.

The Layer panel provides a visual reference of the frames you change when you remap time. It displays two time rulers: The time ruler at the bottom of the panel displays the current time. The Source Time ruler, just above the time ruler, has a remap-time marker that indicates which frame is playing at the current time.

  1. Press the spacebar to preview the layer, and notice that the source-time and current-time markers in the two Layer panel rulers are synchronized. That will change as you remap time.
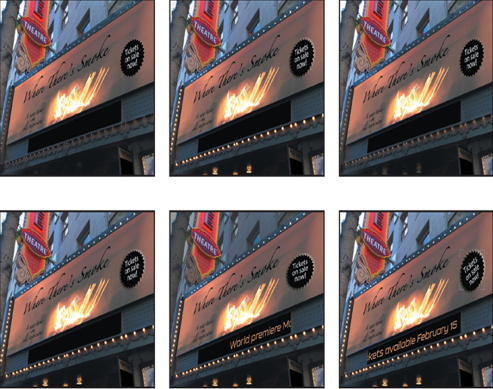
    Over the first four seconds, the lights come on slowly. You’ll speed that section up so that the lights come on twice as fast.
  2. Go to 2:00, and change the Time Remap value to 4:00.
    This remaps time so that frame 4:00 plays at 2:00. In other words, the clip now plays back at twice the speed for the first two seconds of the composition.
  1. Press the spacebar to preview the animation. The composition now runs at double-speed until 2:00, and at a slower speed thereafter. Press the spacebar again when you have finished previewing the animation.

Viewing time remapping in the Graph Editor
Using the Graph Editor, you can view and manipulate all aspects of effects and animations, including effect property values, keyframes, and interpolation. The Graph Editor displays changes in effects and animations as a two-dimensional graph, with playback time represented horizontally (from left to right). In layer bar mode, in contrast, the time ruler represents only the horizontal time element, without a graphical display of changing values.

  1. Make sure the Time Remap property is selected for the Pre-comp 1 layer in the Timeline panel.
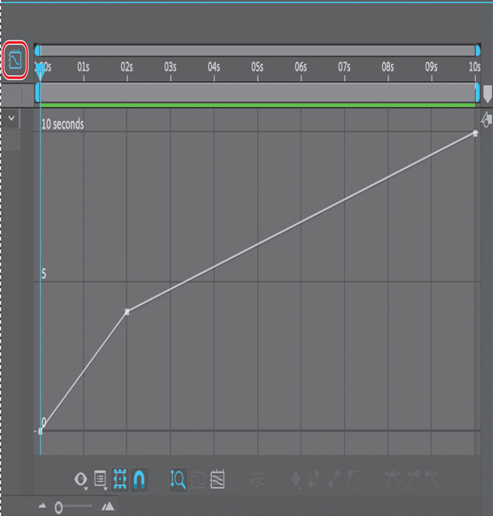
  2. Click the Graph Editor button ( ) to display the Graph Editor.

The Graph Editor displays a time-remap graph that shows a white line connecting the keyframes at 0:00, 2:00, and 10:00. The angle of the line is steep up to 2:00, and then becomes shallower. The steeper the line, the faster the playback time.

Simulating a darkening sky – Animating Layers

The lights come on, but the sky and building remain in daylight. The background should darken as the marquee lights up, showing off the marquee contents and creating a sense of excitement. You’ll use a mask, a solid layer, and a blending mode to provide the contrast.

Creating a mask
You want darkness to fall on the building and sky behind the theater sign. You’ll duplicate the layer, and then create a mask to isolate the area you want to darken.

  1. Press the Home key or move the current-time indicator to the beginning of the time ruler.
  2. In the Timeline panel, select the Lit marquee layer.
  3. Choose Edit > Duplicate. After Effects adds a Lit marquee 2 layer to the layer stack, immediately above the Lit marquee layer.
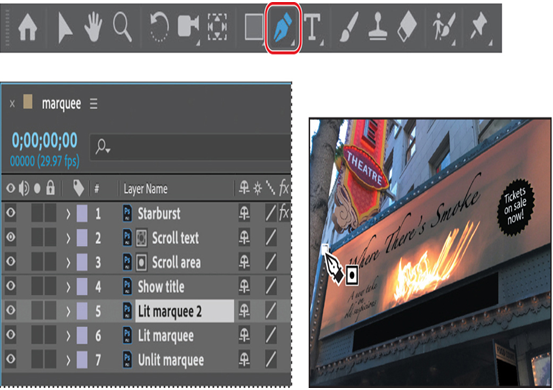
  4. Select the Pen tool ( ) in the Tools panel.
  5. With the Lit marquee 2 layer selected in the Timeline panel, click the upper left corner of the marquee to start drawing.
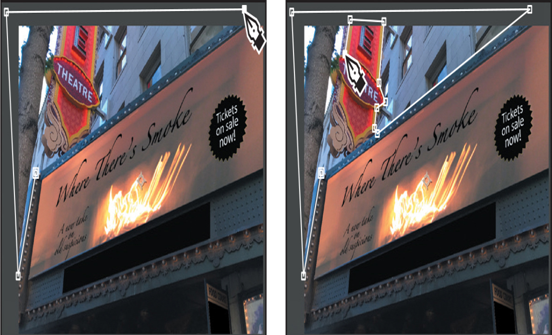
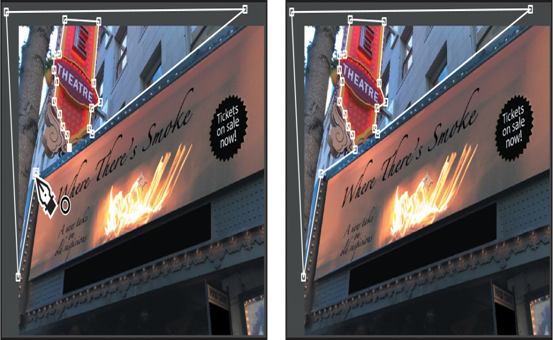
  1. Click additional points to continue the mask around the left edge of the marquee, the left and upper edge of the background, and the theatre sign, as in the image below. You’ll need to create some points of the mask on the pasteboard outside the image.
  1. Continue around the theatre sign, and then click your starting point again to close the mask.
Adding a solid layer

Now that you’ve masked the background, you’ll add the layer that will affect it, and then animate the opacity of that layer.

  1. Select the Lit marquee layer in the Timeline panel.
  2. Choose Layer > New > Solid.
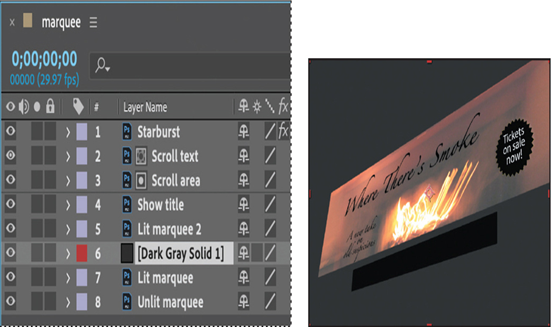
  3. In the Solid Settings dialog box, make sure a dark gray color is selected, click Make Comp Size, and then click OK. After Effects adds a layer named Dark Gray Solid 1 between the Lit marquee and Lit marquee 2 layers.

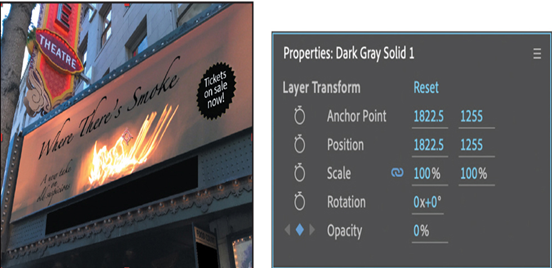
With the current-time indicator at the beginning of the time ruler, most of the image will darken, because neither the Lit marquee layer nor the Lit marquee 2 layer (with its mask) are visible yet. Don’t worry; you’ll animate the solid layer’s opacity to account for that.

  1. Select the Lit marquee 2 layer, and press M if the Mask property isn’t already displayed.
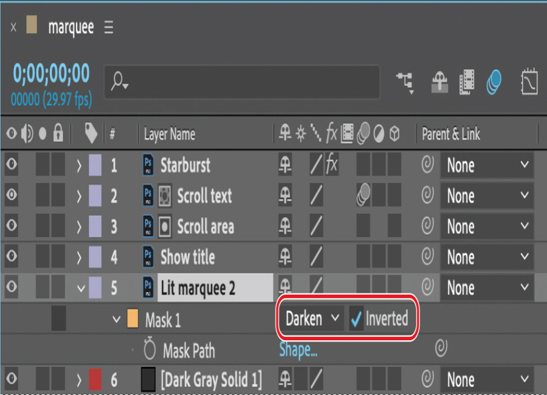
  2. Choose Darken from the Mask Mode menu, and select Inverted.
    You drew around the background, but that’s the area you want to remain unmasked. When you invert the mask, the unselected area becomes masked instead.
  1. Select the Dark Gray Solid layer. Make sure the current-time indicator is at the beginning of the time ruler (0:00). Then, change the Opacity value to 0% in the Properties panel, and click the stopwatch icon ( ) to create an initial keyframe.
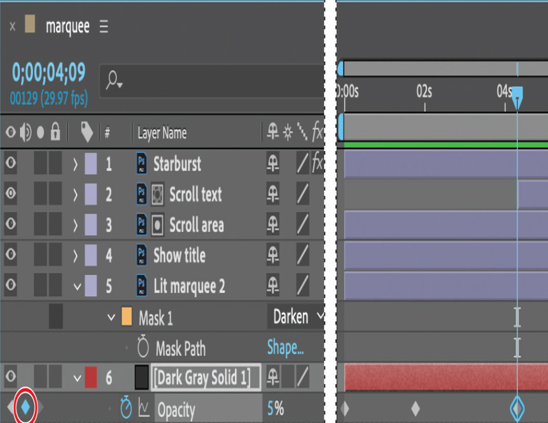
  1. Go to 1:23, and change the Opacity to 5%.
  2. Go to 4:09, and click the Add Or Remove Keyframe button to create an additional keyframe with Opacity at 5%.

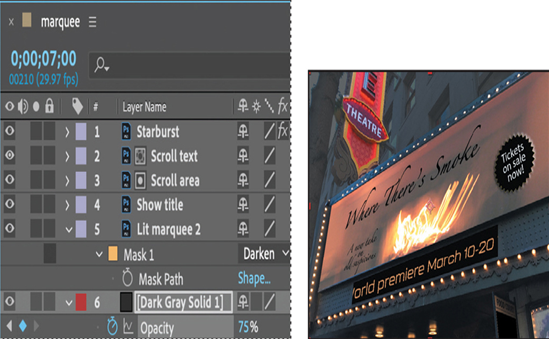
9. Go to 7:00, and change the Opacity to 75%.

  1. Press the Home key or move the current-time indicator to the beginning of the time ruler. Press the spacebar to preview the animation. When you’re done, press the spacebar again.

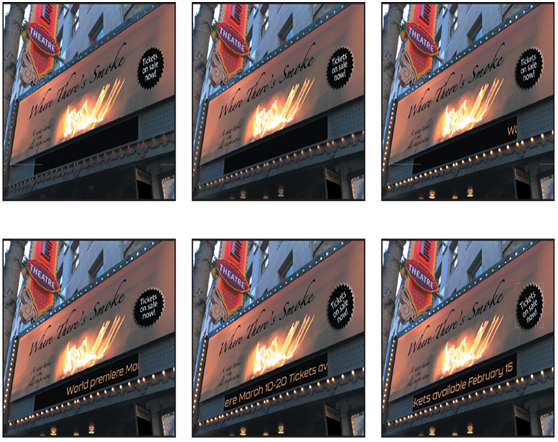
As the lights brighten and the text begins to move, the surrounding building and sky gradually darken. Your scene is complete.

  1. Hide the properties for all layers, and save your work.

Adding motion blur – Animating Layers

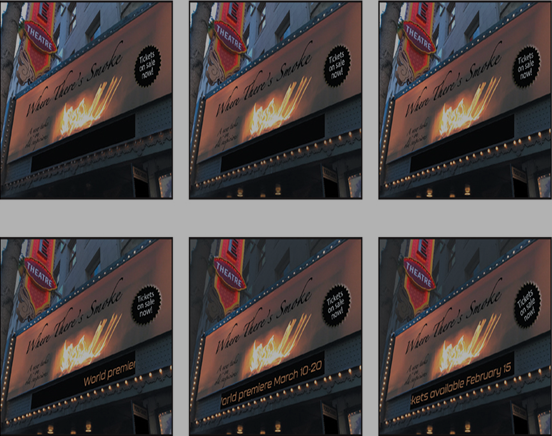
The text’s movement will look more authentic if it includes motion blur. You’ll add the motion blur and then set the shutter angle and phase, which control the intensity of the blur.

  1. Go to 8:00, so you can see the scrolling text well.
  2. Click Toggle Switches/Modes at the bottom of the Timeline panel.
  3. Click the Motion Blur ( ) switch for the Scroll text layer.
    After Effects enables Motion Blur for the entire composition, and the text layer appears less sharp in the Composition panel.
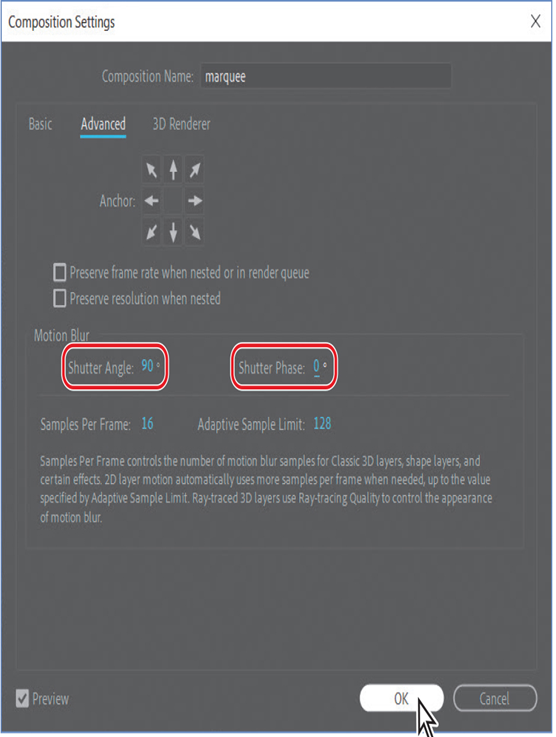
  4. Choose Composition > Composition Settings.
  5. In the Composition Settings dialog box, click the Advanced tab, and reduce the Shutter Angle to 90 degrees.
    The Shutter Angle setting imitates the effect of adjusting a shutter angle on a real camera, which controls how long the camera aperture is open, gathering light. Larger values create more motion blur.
  6. Change the Shutter Phase to 0 degrees, and then click OK.

Animating using the Corner Pin effect

The marquee is looking pretty good, but the starburst isn’t terribly noticeable. You’ll use the Corner Pin effect to distort it over time and draw attention to it.

Using the Corner Pin effect is similar to animating with the Free Transform tool in Photoshop—the effect distorts an image by repositioning each of its four corners. You can use it to stretch, shrink, skew, or twist an image, or to simulate perspective or movement that pivots from the edge of a layer, such as a door opening.

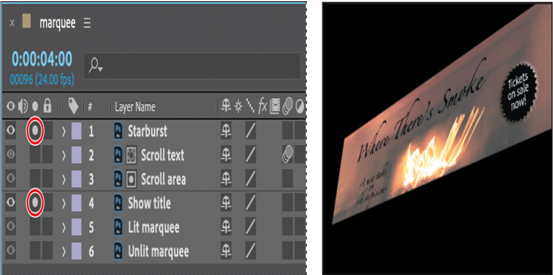
  1. Go to 4:00.
  2. In the Timeline panel, click the Solo switch (Solo switch icon) for both the Show title and Starburst layers.

Soloing the layers isolates them to speed animating, previewing, and rendering.

  1. Select the Starburst layer in the Timeline panel, and then choose Effect > Distort > Corner Pin. Small circles appear around the corner points of the Starburst layer in the Composition panel.
    Note
    If you don’t see the controls, choose View Options from the Composition panel menu. In the View Options dialog box, select the Handles and Effect Controls options, and then click OK.
    You’ll start by creating initial keyframes at their current locations.
  2. If the Effect Controls panel isn’t already open, choose Window > Effect Controls.
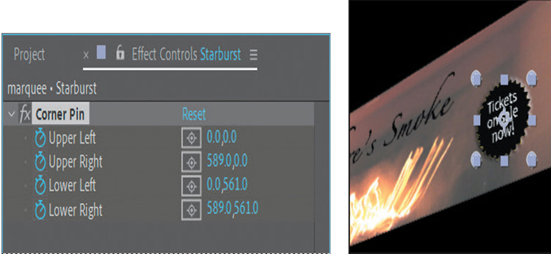
  3. In the Effect Controls panel, click the stopwatch icon ( ) next to each of the pins—Upper Left, Upper Right, Lower Left, and Lower Right—to set initial keyframes.
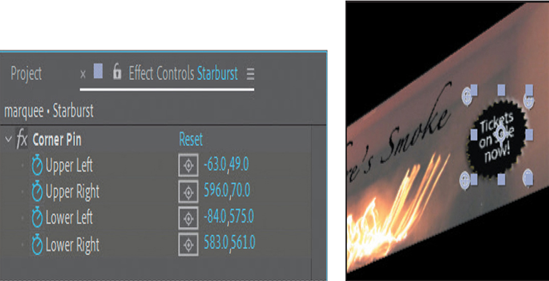
  1. Go to 6:00, and then drag each of the four corner-pin handles outward. With the Corner Pin tool, you can move each handle a different amount. Notice that the x and y coordinates update in the Effect Controls panel. After Effects adds keyframes.
    Instead of dragging the handles, you can manually enter the values shown in the following figure.
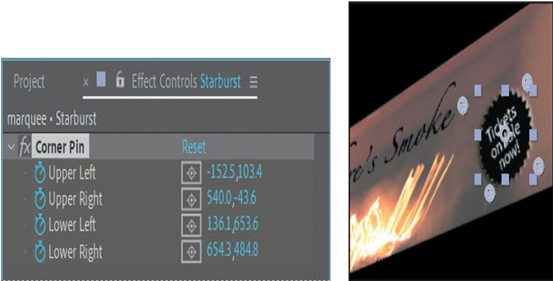
  1. Go to 8:00, and then drag the corner-pin handles so that the text is tilted at an angle. Your corner-pin locations should be similar to those in the figure below. After Effects adds keyframes.
  1. Click the Solo switches ( ) for the Show title and Starburst layers to restore the view of the other layers.
  2. Press the Home key or move the current-time indicator to the beginning of the time ruler. Press the spacebar to preview the entire animation, including the corner-pin effect. When you’re done, press the spacebar again.

10. Choose File > Save to save your project.

Duplicating an animation using the pick whip – Animating Layers

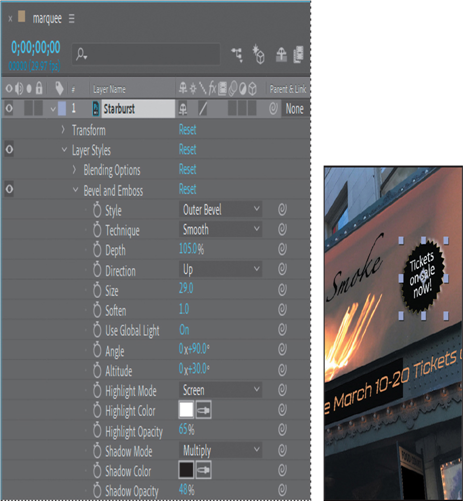
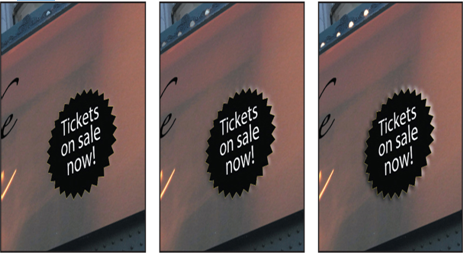
The Starburst layer includes the Bevel And Emboss layer style from Photoshop. You’ll animate the bevel, which makes the starburst appear backlit, so that it lights up as the marquee does.

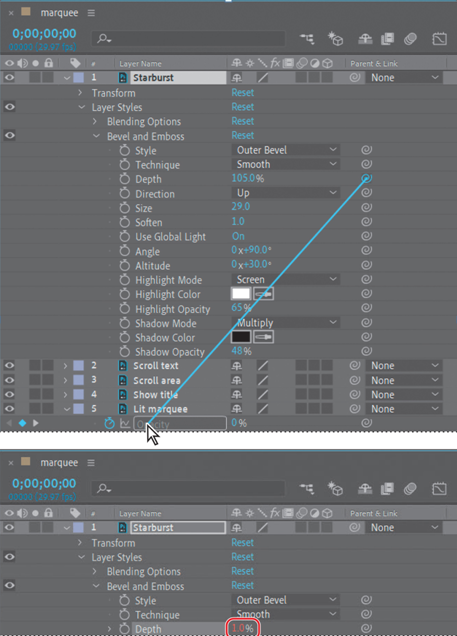
To do this, you’ll use the pick whip to duplicate the animation you just created. You can use the pick whip to create expressions that link the values of one property or effect to another. In this case, you’ll link the opacity of the Lit marquee layer to the Depth property of the Bevel And Emboss effect in the Starburst layer.

  1. Press the Home key or move the current-time indicator to the beginning of the time ruler.
  2. Expand the Starburst layer, and then expand its Layer Styles > Bevel And Emboss properties.
  1. If necessary, enlarge the Timeline panel so that you can see both the Lit marquee and Starburst properties.
  2. Make sure the Opacity property is still visible for the Lit marquee layer.
  3. Click the pick whip icon ( ) for the Depth property in the Starburst layer, and drag it to the Opacity property name for the Lit marquee layer. When you release the mouse, the pick whip snaps, and the Depth property value is red.
  1. Expand the Depth property for the Starburst layer. An expression in the Starburst layer time ruler now reads “thisComp.layer(“Lit marquee”).transform.opacity.” This means that the Opacity value for the Lit marquee layer replaces the previous Depth value (105%) for the Starburst layer.
  1. Drag the current-time indicator from 0:00 to 4:00. Notice that the Opacity value for the Lit marquee layer and the Depth property for the Starburst layer increase simultaneously. The area around the starburst and the marquee light bulbs brighten in sync.
  1. Hide the properties for all layers to keep the Timeline panel tidy. If you enlarged the Timeline panel, return it to its original size.
  2. Choose File > Save to save your project.

About Photoshop layer styles

Adobe Photoshop provides a variety of layer styles—such as shadows, glows, and bevels—that change the appearance of a layer. After Effects can preserve these layer styles when you import Photoshop layers. You can also apply layer styles in After Effects.

Though layer styles are referred to as effects in Photoshop, they behave more like blending modes in After Effects. Layer styles follow transformations in the standard render order, whereas effects precede transformations. Another difference is that each layer style blends directly with the underlying layers in the composition, whereas an effect is rendered on the layer to which it’s applied, the result of which then interacts with the underlying layers as a whole.

The layer style properties are available for the layer in the Timeline panel.

To learn more about working with layer styles in After Effects, see After Effects Help.

Trimming a layer – Animating a Multimedia Presentation

You don’t need the Wave Warp effect until the canvas flies off the balloon, but even if the values are 0, After Effects will have to calculate the effect for the entire layer. So you’ll trim the layer to speed up the time it takes to render the file.

  1. Go to 9:12.
  2. Press Alt+[ (Windows) or Option+[ (macOS) to set the In point to 9:12.
    Note
    Press [ to move the In point of a clip without changing its duration. Press Alt+[ or Option+[ to trim a clip to a new In point, shortening its duration.
  3. Return to the Balloon Scene Timeline panel.
  4. Press the spacebar to preview the movie. Press the spacebar again to stop the preview.

  1. Save your work so far.

Animating the background
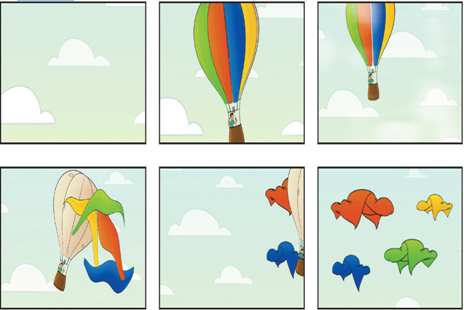
The movie should end with the revelation that the canvas from the balloon has been draped on the clouds. But right now, the canvas flies off and the balloon floats away. You need to animate the sky so that the canvas-covered clouds are centered at the end of the scene.

  1. In the Balloon Scene Timeline panel, go to the beginning of the time ruler (0:00).
  2. Select the Sky layer. In the Properties panel, click the stopwatch icon for the Position property to create an initial keyframe.
  3. Go to 16:00, and drag the Sky layer down and to the left until the wrapped clouds are in the center of the frame. (Our values are –236.4, 566.7.)
  4. Go to 8:00, and move the wrapped clouds completely off the screen, far off to the right.
  5. Right-click or Control-click the first keyframe, and choose Keyframe Assistant > Easy Ease Out.
  6. Right-click the middle keyframe, and choose Keyframe Assistant > Easy Ease, and then right-click the last keyframe, and choose Keyframe Assistant > Easy Ease In.
  7. Move the current-time indicator through the time ruler to see how the departure of the canvas matches up with the appearance of the canvas-covered clouds. The canvas should be completely offscreen before the canvas-covered clouds appear.
  8. Move the middle keyframe forward and backward in the time ruler to adjust the sky animation so that it matches the progress of the canvas and the balloon. The bare balloon should float in front of at least a few of the canvas-covered clouds before it disappears.
  9. Press the spacebar to preview the entire video. Press the spacebar again to stop the preview.
  1. Adjust the motion paths and rotations for the balloon, canvas pieces, or the sky as necessary.
  2. Hide the properties for all layers, and save the project.

Supported audio file formats
You can import any of the following types of audio files into After Effects:
• Advanced Audio Coding (AAC, M4A)
• Audio Interchange File Format (AIF, AIFF)
• MP3 (MP3, MPEG, MPG, MPA, MPE)
• Waveform (WAV)

Animating precomposed layers – Animating a Multimedia Presentation

Earlier, you precomposed the four canvas layers, creating a composition called Canvas. You then positioned the Canvas composition layer to match the balloon, and parented the two. Now, you’ll animate the canvas layers so that they blow off the balloon when the gust of wind occurs.

  1. Double-click the Canvas layer to open the Canvas composition in the Composition panel and the Timeline panel.
  2. Go to 9:10, which is about a second after the wind effect begins.
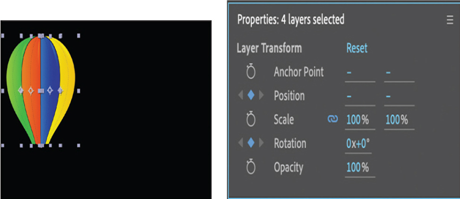
  3. Shift-select all four layers, and then, in the Properties panel, click the stopwatch icons for the Position and Rotation properties to create initial keyframes for all of the layers.
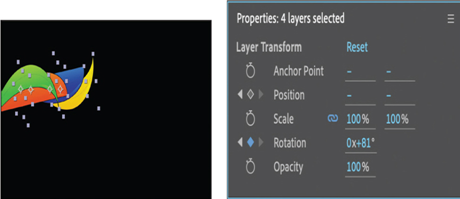
  1. Go to 9:24.
  2. With all layers still selected, drag a Rotation value until the canvas is nearly horizontal (about 81 degrees). All four canvas layers rotate.
  1. Press F2 or click an empty area in the Timeline panel to deselect all layers so you can adjust their Rotation values separately.
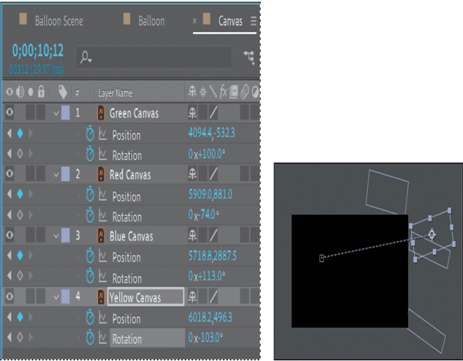
  2. Adjust each Rotation value, using positive and negative numbers so that there is some variation in their appearance. (We used these values: Green +100, Red –74, Blue +113, Yellow –103.)
  3. Go to 10:12.
  4. Move all the canvas layers off the screen to the right. Vary their motion paths to make them more interesting. You can add intermediate rotation and position keyframes (between 10:06 and 10:12), edit Bezier curves, or just drag the canvas layers off the edge. If you edit the Bezier curves, make changes only to the keyframes on the right side of the motion path (at 10:12) so you don’t disturb the original balloon formation.
  1. Move the current-time indicator across the time ruler to preview the animation, and then make any adjustments you want.
  1. Hide the properties for all layers, and save your work.

Adding an adjustment layer
You’ll add a warp effect to the canvas. You can use an adjustment layer to apply an effect to all the layers beneath it at once.

  1. Click an empty area in the Timeline panel to deselect all layers.
  2. Choose Layer > New > Adjustment Layer.
    A new adjustment layer is automatically added to the top of the layer stack.
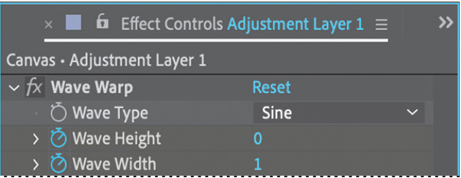
  3. In the Effects & Presets panel, navigate to the Wave Warp effect in the Distort category, and then double-click the effect.
  4. Go to 9:12.
  1. In the Effect Controls panel, change Wave Height to 0 and Wave Width to 1. Then click the stopwatch icons to create initial keyframes for each of them.
  2. Go to 9:16.
  3. Change the Wave Height value to 90 and the Wave Width value to 478.

Applying the effects – Animating a Multimedia Presentation

You’re ready to apply the effects to the solid layer. The Fractal Noise effect will create the gust of wind. The Directional Blur effect will create a blur in the direction the canvas flies.

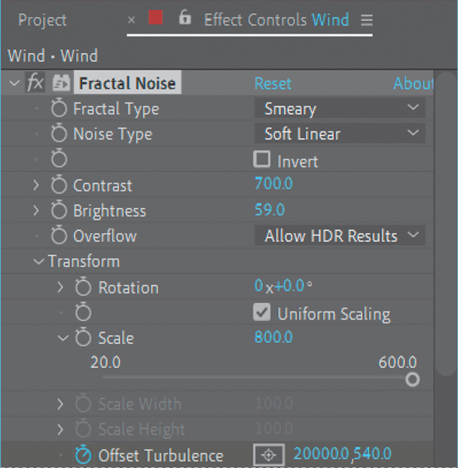
  1. In the Effects & Presets panel, search for the Fractal Noise effect; it’s in the Noise & Grain category. Double-click the Fractal Noise effect to apply it.
  2. In the Effect Controls panel, do the following:

• Choose Smeary for the Fractal Type.
• Choose Soft Linear for the Noise Type.
• Set the Contrast to 700.
• Set the Brightness to 59.
• Expand the Transform properties, and set the Scale to 800.

  1. Click the stopwatch icon next to Offset Turbulence to create an initial keyframe at the beginning of the time ruler.
  2. Go to 2:00, and change the x value for Offset Turbulence to 20,000.
  3. Hide the Fractal Noise properties in the Effect Controls panel.
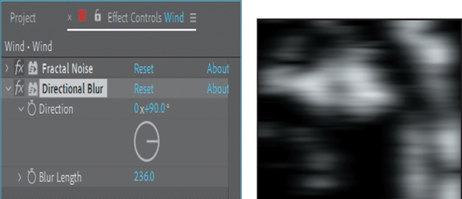
  4. In the Effects & Presets panel, search for the Directional Blur effect, and then double-click it to apply it.
  5. In the Effect Controls panel, set the Direction to 90 degrees and the Blur Length to 236.

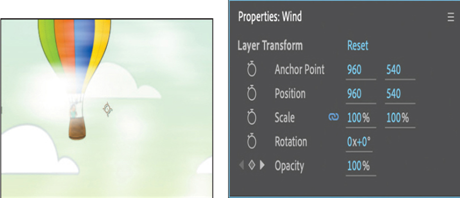
You’ve created a sense of motion. Now you need to add the Wind composition to the Balloon Scene composition.

  1. Switch to the Balloon Scene Timeline panel.
  2. Click the Project tab, and then drag the Wind composition from the Project window into the Balloon Scene Timeline above all the other layers.
  3. Go to 8:10, and then press the left bracket key ([) so that the Wind layer starts at 8:10.
    Finally, you’ll apply a blending mode and adjust the opacity to make the effect of the wind more subtle.
  4. Click Toggle Switches/Modes at the bottom of the Timeline panel to view the Mode column.
  5. Choose Screen from the Wind layer’s Mode pop-up menu.
  6. With the Wind layer selected, click the stopwatch icon for the Opacity property in the Properties panel to create a keyframe at the beginning of the layer (8:10).
  1. Go to 8:20, and change the opacity to 35%.
  2. Go to 10:20, and change the opacity to 0%.
  3. Hide the Opacity property in the Timeline panel, and then save your work so far.