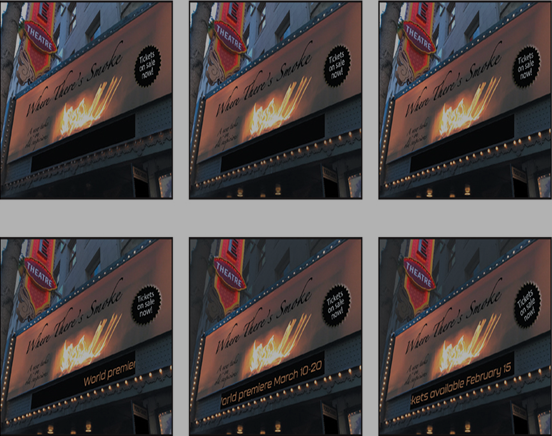
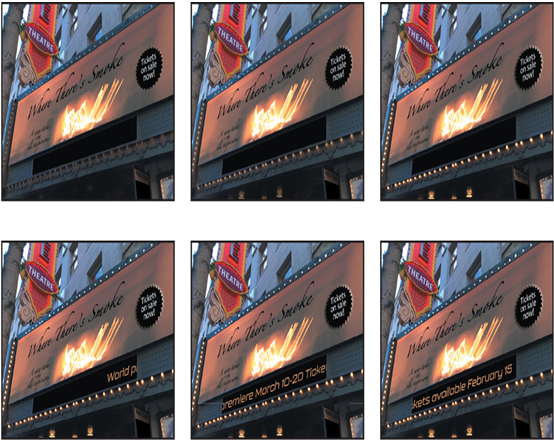
Viewing render times for layers – Animating Layers

In a complex project, it can be helpful to know which components are contributing to long render times. For example, you may find it helpful to turn off some layers or specific effects while you work on other aspects of your project.

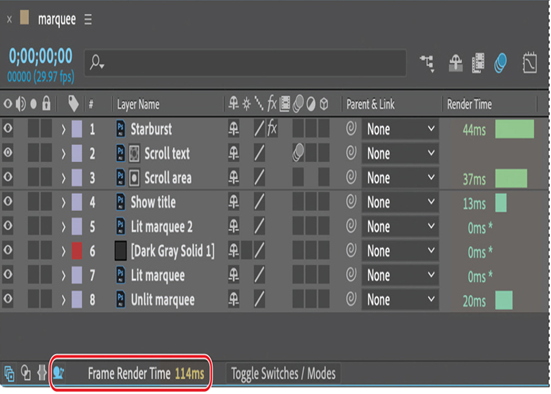
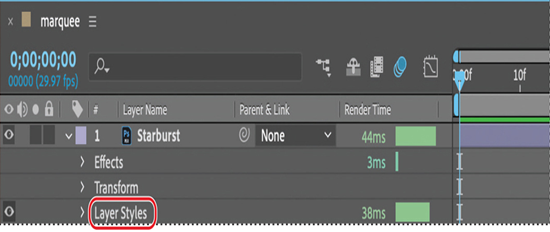
You can see the overall render time for the current frame at the bottom of the Timeline panel. When you turn on the Composition Profiler, you can see the rendering time of each layer, effect, mask, and layer style in the current frame in the Render Time column.

  1. Click the snail icon (Snail icon) at the bottom of the Timeline panel.

The Render Time column appears in the Timeline panel, displaying the render time for each layer active in the current frame.

  1. Drag the current-time indicator across the time ruler to see how render times differ for each layer on different frames.
  2. Expand the Starburst layer. Notice that the layer styles that were applied in Photoshop increase the render time.
  1. Hide layer properties. Click the snail icon again to turn off the Composition profiler, or leave it on if you want to see how rendering times are affected by changes you make to layers.

Retiming the composition
So far, you have created a straightforward time-lapse simulation. That’s fine, but After Effects offers more ways to play with time using the time-remapping feature. Time remapping lets you dynamically speed up, slow down, stop, or reverse footage.
Tip
You can get even finer control with the Timewarp effect, which you’ll use in Lesson 14, “Advanced Editing Techniques.”
You can also use it to do things like create a freeze-frame result. The Graph Editor and the Layer panel are a big help when remapping time, as you’ll see in the following exercise, when you retime the project so that the time-lapse speed changes over the course of the movie.

Precomposing layers
For this exercise, you’ll duplicate the composition and then precompose the layers, which will be easier to remap than the original.

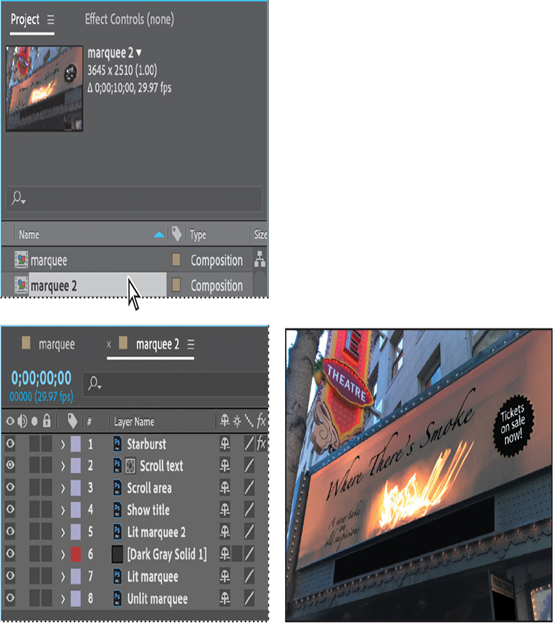
  1. Select the marquee composition in the Project panel, and choose Edit > Duplicate.
    A marquee 2 composition appears in the Project panel.
  2. Double-click the marquee 2 composition to open it in the Composition and Timeline panels.
  1. In the marquee 2 Timeline panel, select the Starburst layer and then Shift-select the Unlit marquee layer, so that all the layers are selected.
  2. Choose Layer > Pre-compose.
  3. In the Pre-compose dialog box, make sure Move All Attributes Into The New Composition is selected, and then click OK.
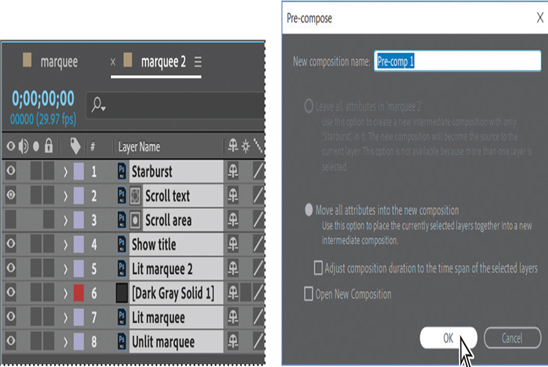
After Effects creates a new composition named Pre-comp 1, which replaces the layers you selected in the marquee 2 composition. Now you can remap all of the elements of the project at once.
Simulating a darkening sky – Animating Layers

The lights come on, but the sky and building remain in daylight. The background should darken as the marquee lights up, showing off the marquee contents and creating a sense of excitement. You’ll use a mask, a solid layer, and a blending mode to provide the contrast.

Creating a mask
You want darkness to fall on the building and sky behind the theater sign. You’ll duplicate the layer, and then create a mask to isolate the area you want to darken.

  1. Press the Home key or move the current-time indicator to the beginning of the time ruler.
  2. In the Timeline panel, select the Lit marquee layer.
  3. Choose Edit > Duplicate. After Effects adds a Lit marquee 2 layer to the layer stack, immediately above the Lit marquee layer.
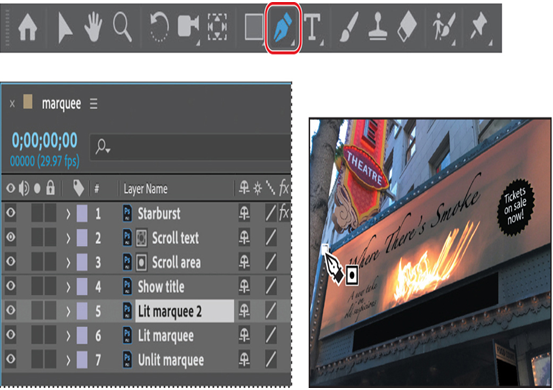
  4. Select the Pen tool ( ) in the Tools panel.
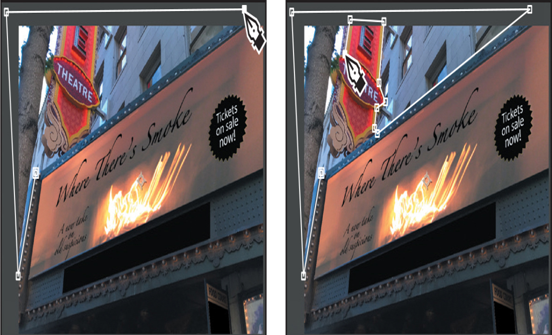
  5. With the Lit marquee 2 layer selected in the Timeline panel, click the upper left corner of the marquee to start drawing.
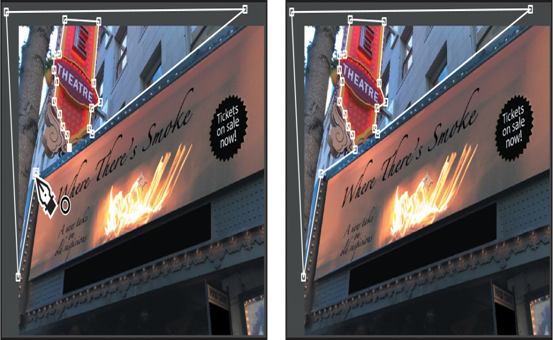
  1. Click additional points to continue the mask around the left edge of the marquee, the left and upper edge of the background, and the theatre sign, as in the image below. You’ll need to create some points of the mask on the pasteboard outside the image.
  1. Continue around the theatre sign, and then click your starting point again to close the mask.

Adding a solid layer

Now that you’ve masked the background, you’ll add the layer that will affect it, and then animate the opacity of that layer.

  1. Select the Lit marquee layer in the Timeline panel.
  2. Choose Layer > New > Solid.
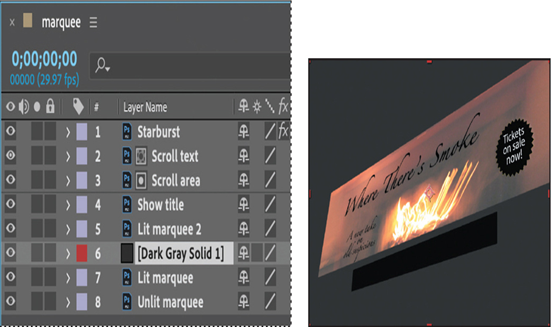
  3. In the Solid Settings dialog box, make sure a dark gray color is selected, click Make Comp Size, and then click OK. After Effects adds a layer named Dark Gray Solid 1 between the Lit marquee and Lit marquee 2 layers.

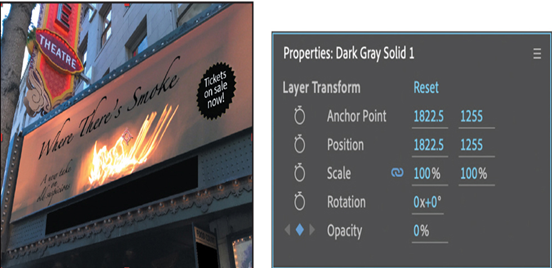
With the current-time indicator at the beginning of the time ruler, most of the image will darken, because neither the Lit marquee layer nor the Lit marquee 2 layer (with its mask) are visible yet. Don’t worry; you’ll animate the solid layer’s opacity to account for that.

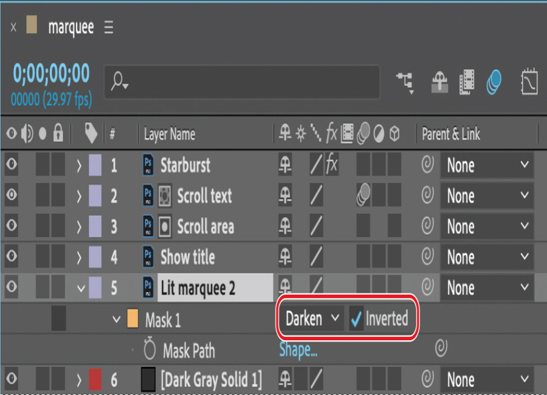
  1. Select the Lit marquee 2 layer, and press M if the Mask property isn’t already displayed.
  2. Choose Darken from the Mask Mode menu, and select Inverted.
    You drew around the background, but that’s the area you want to remain unmasked. When you invert the mask, the unselected area becomes masked instead.
  1. Select the Dark Gray Solid layer. Make sure the current-time indicator is at the beginning of the time ruler (0:00). Then, change the Opacity value to 0% in the Properties panel, and click the stopwatch icon ( ) to create an initial keyframe.
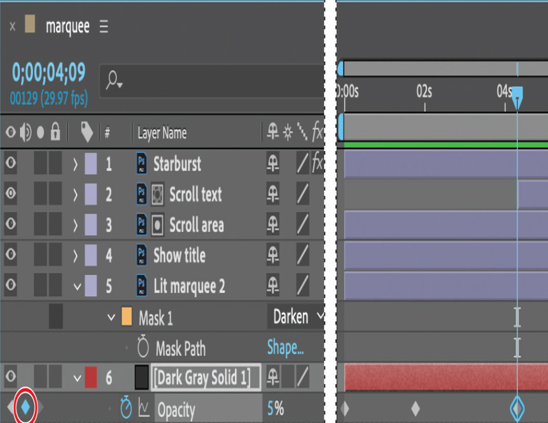
  1. Go to 1:23, and change the Opacity to 5%.
  2. Go to 4:09, and click the Add Or Remove Keyframe button to create an additional keyframe with Opacity at 5%.

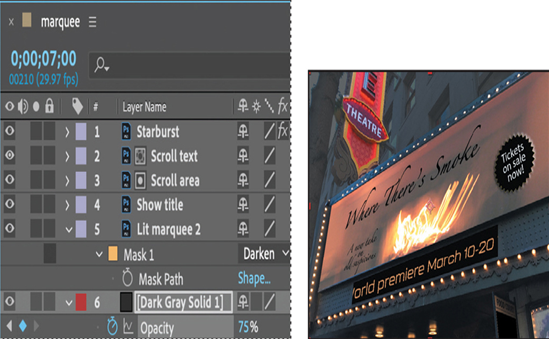
9. Go to 7:00, and change the Opacity to 75%.

  1. Press the Home key or move the current-time indicator to the beginning of the time ruler. Press the spacebar to preview the animation. When you’re done, press the spacebar again.

As the lights brighten and the text begins to move, the surrounding building and sky gradually darken. Your scene is complete.

  1. Hide the properties for all layers, and save your work.

Adding motion blur – Animating Layers

The text’s movement will look more authentic if it includes motion blur. You’ll add the motion blur and then set the shutter angle and phase, which control the intensity of the blur.

  1. Go to 8:00, so you can see the scrolling text well.
  2. Click Toggle Switches/Modes at the bottom of the Timeline panel.
  3. Click the Motion Blur ( ) switch for the Scroll text layer.
    After Effects enables Motion Blur for the entire composition, and the text layer appears less sharp in the Composition panel.
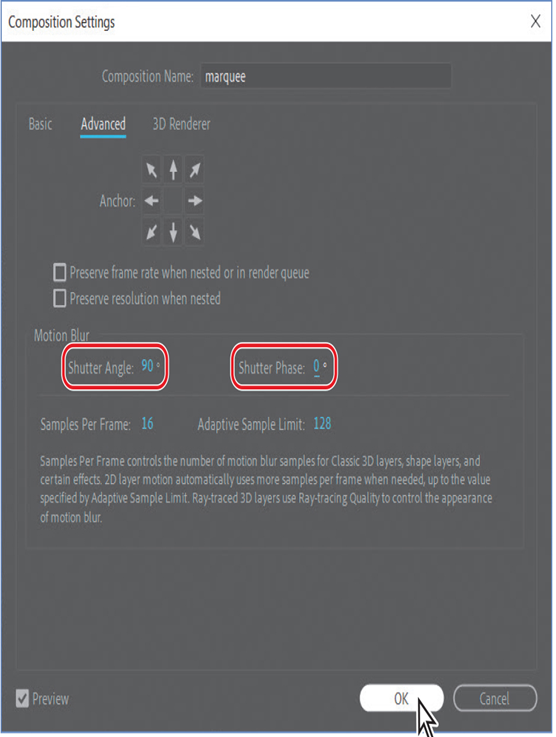
  4. Choose Composition > Composition Settings.
  5. In the Composition Settings dialog box, click the Advanced tab, and reduce the Shutter Angle to 90 degrees.
    The Shutter Angle setting imitates the effect of adjusting a shutter angle on a real camera, which controls how long the camera aperture is open, gathering light. Larger values create more motion blur.
  6. Change the Shutter Phase to 0 degrees, and then click OK.

Animating using the Corner Pin effect

The marquee is looking pretty good, but the starburst isn’t terribly noticeable. You’ll use the Corner Pin effect to distort it over time and draw attention to it.

Using the Corner Pin effect is similar to animating with the Free Transform tool in Photoshop—the effect distorts an image by repositioning each of its four corners. You can use it to stretch, shrink, skew, or twist an image, or to simulate perspective or movement that pivots from the edge of a layer, such as a door opening.

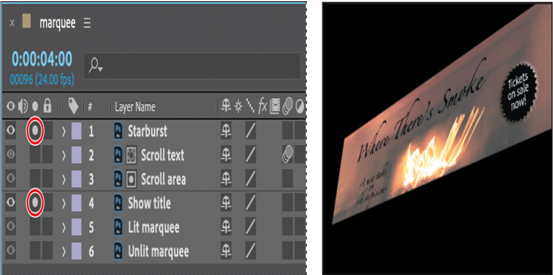
  1. Go to 4:00.
  2. In the Timeline panel, click the Solo switch (Solo switch icon) for both the Show title and Starburst layers.

Soloing the layers isolates them to speed animating, previewing, and rendering.

  1. Select the Starburst layer in the Timeline panel, and then choose Effect > Distort > Corner Pin. Small circles appear around the corner points of the Starburst layer in the Composition panel.
    Note
    If you don’t see the controls, choose View Options from the Composition panel menu. In the View Options dialog box, select the Handles and Effect Controls options, and then click OK.
    You’ll start by creating initial keyframes at their current locations.
  2. If the Effect Controls panel isn’t already open, choose Window > Effect Controls.
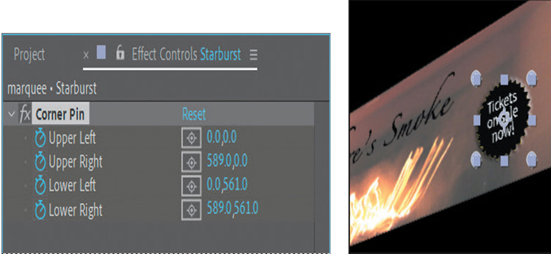
  3. In the Effect Controls panel, click the stopwatch icon ( ) next to each of the pins—Upper Left, Upper Right, Lower Left, and Lower Right—to set initial keyframes.
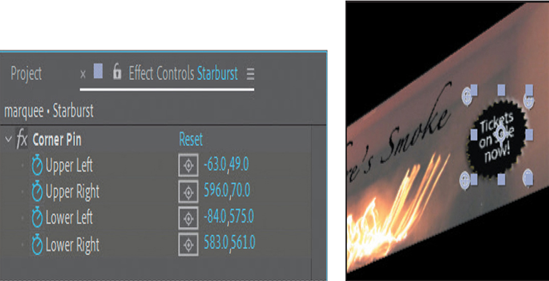
  1. Go to 6:00, and then drag each of the four corner-pin handles outward. With the Corner Pin tool, you can move each handle a different amount. Notice that the x and y coordinates update in the Effect Controls panel. After Effects adds keyframes.
    Instead of dragging the handles, you can manually enter the values shown in the following figure.
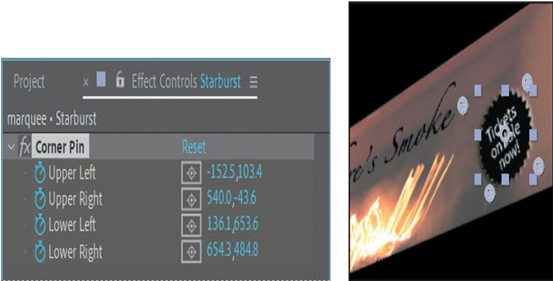
  1. Go to 8:00, and then drag the corner-pin handles so that the text is tilted at an angle. Your corner-pin locations should be similar to those in the figure below. After Effects adds keyframes.
  1. Click the Solo switches ( ) for the Show title and Starburst layers to restore the view of the other layers.
  2. Press the Home key or move the current-time indicator to the beginning of the time ruler. Press the spacebar to preview the entire animation, including the corner-pin effect. When you’re done, press the spacebar again.

10. Choose File > Save to save your project.

Creating the track matte – Animating Layers

The text scrolls well, but it overlaps the rest of the marquee, and even the lights on the left side. You’ll use a track matte to confine the text to the black ticker field. You’ll use the alpha channel of the Scroll area layer for the track matte.

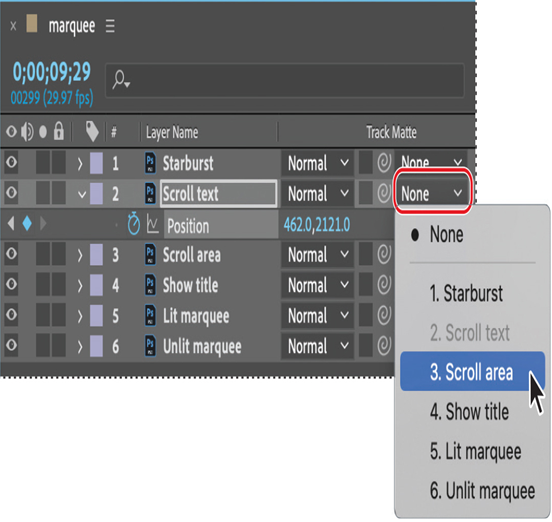
  1. Click Toggle Switches/Modes at the bottom of the Timeline panel to display the Track Matte column, so you can apply the track matte.
  2. Select the Scroll text layer, and choose “3. Scroll area” from the Track Matte pop-up menu.

The alpha channel of the layer you selected (Scroll area) is used to set transparency for the Scroll text layer, so the contents of that layer appear only within the matte defined by the Scroll area layer. The video switch is automatically deselected for the Scroll area layer when you apply the track matte.
With the Scroll area layer deselected there are light artifacts at the top of the text area. You’ll make the layer visible to hide those lights without compromising the track matte.

  1. Click the eye icon ( ) for the Scroll area layer in the Timeline panel.
  2. Deselect all layers, and hide all layer properties.
  3. Press the Home key or move the current-time indicator to the beginning of the time ruler, and then press the spacebar to preview the animation. Press the spacebar again when you’re done.
  1. Choose File > Save to save your project.

About track mattes and traveling mattes
When you want one layer to show through a hole in another layer, set up a track matte. You’ll need two layers—one to act as a matte, the other to fill the hole in the matte. You can animate either the track matte layer or the fill layer. When you animate the track matte layer, you create a traveling matte. If you want to animate the track matte and fill layers using identical settings, you can precompose them.


You define transparency in a track matte using values from either its alpha channel or the luminance of its pixels. Using luminance is handy when you want to create a track matte from a layer without an alpha channel, or a layer imported from a program that can’t create an alpha channel. In both alpha-channel mattes and luminance mattes, pixels with higher values are more transparent. In most cases, you use a high-contrast matte so that areas are either completely transparent or completely opaque. Intermediate shades should appear only where you want partial or gradual transparency, such as along a soft edge.
By default, After Effects uses alpha channel values to create a track matte. To use the luminance values instead, click the circle icon ( ) next to the Track Matte column to change it to the sun icon ( ). To invert the matte, click the empty square so that it displays the inverted icon ( ).

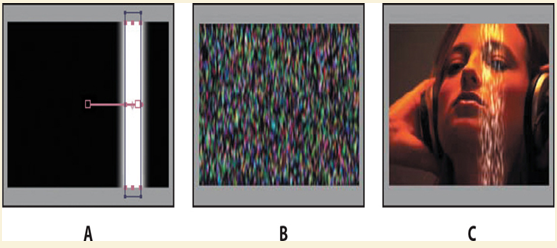
Anatomy of a traveling matte

A. Track matte layer: A solid with a rectangular mask, set to Luma Matte. The mask is animated to travel across the screen.

B. Fill layer: A solid with a pattern effect.

C. Result: The pattern is seen in the track matte’s shape and added to the image layer, which is below the track matte layer.

About expressions – Animating Layers

When you want to create and link complex animations, such as multiple car wheels spinning, but want to avoid creating tens or hundreds of keyframes by hand, you can use expressions instead. With expressions, you can create relationships between layer properties and use one property’s keyframes to dynamically animate another layer. For example, if you set rotation keyframes for a layer and then apply the Drop Shadow effect, you can use an expression to link the Rotation property’s values with the Drop Shadow effect’s Direction values; that way, the drop shadow changes with the layer as it rotates.

You work with expressions in the Timeline panel or the Effect Controls panel. You can use the pick whip to create expressions, or you can enter and edit expressions manually in the expression field—a text field in the time graph under the property.

Expressions are based on the JavaScript language, but you don’t need to know JavaScript to use them. You can create expressions using the pick whip, by using simple examples and modifying them to suit your needs, or by chaining objects and methods together.

For more information about expressions, see After Effects Help.

Using a track matte to confine animation

Text should scroll across the bottom of the marquee, but only in the black field. You’ll animate the text, and then create a track matte to confine it to the designated area, so that it appears to be an electronic ticker.

Animating the text

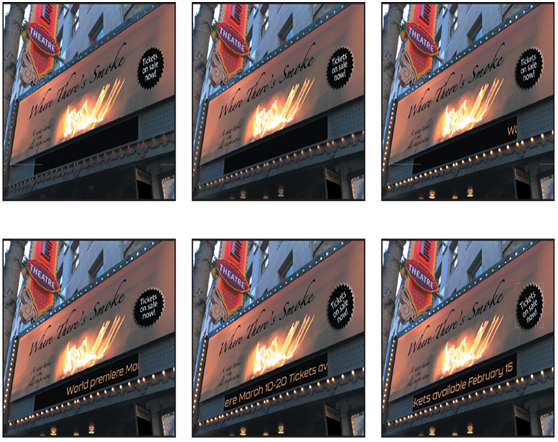
The text should start scrolling after the marquee lights up, and it should continue scrolling until the end of the clip.

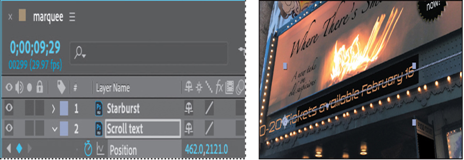
  1. In the Timeline panel, select the Scroll text layer.
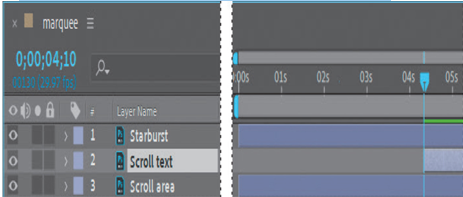
  2. Go to 4:10.
  3. Press Alt+[ (Windows) or Option+[ (macOS) to set the In point to 4:10.

The text will appear on screen at 4:10, shortly after the marquee is fully lit.

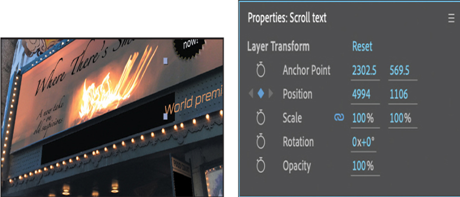
  1. With the Scroll text layer selected, change the Position property in the Properties panel to 4994, 1106.
    Only the first character of the text appears in the black ticker area.
  2. Click the stopwatch icon ( ) to create an initial keyframe.
  1. Go to 9:29, the last frame in the clip.
  2. Change the Position property to 462, 2121.

After Effects creates a keyframe. The last character in the text is visible in the ticker field.

  1. Press the spacebar to preview the scrolling text. Press the spacebar again to end the preview.

Duplicating an animation using the pick whip – Animating Layers

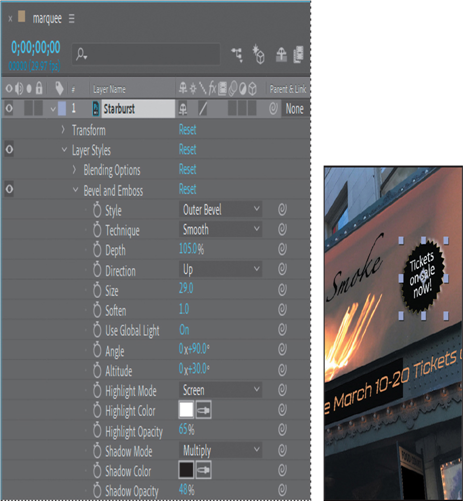
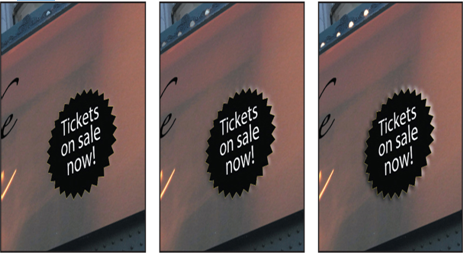
The Starburst layer includes the Bevel And Emboss layer style from Photoshop. You’ll animate the bevel, which makes the starburst appear backlit, so that it lights up as the marquee does.

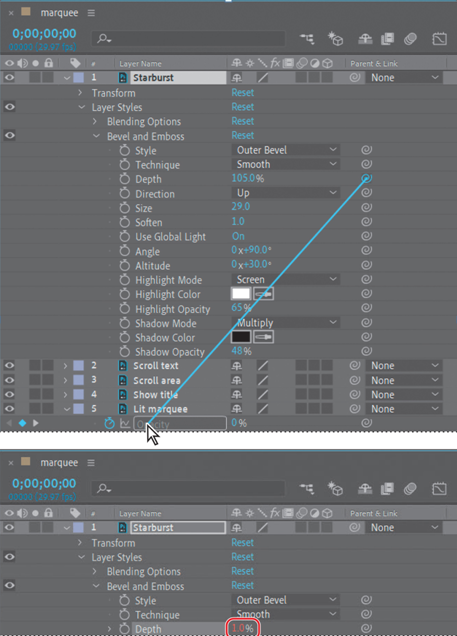
To do this, you’ll use the pick whip to duplicate the animation you just created. You can use the pick whip to create expressions that link the values of one property or effect to another. In this case, you’ll link the opacity of the Lit marquee layer to the Depth property of the Bevel And Emboss effect in the Starburst layer.

  1. Press the Home key or move the current-time indicator to the beginning of the time ruler.
  2. Expand the Starburst layer, and then expand its Layer Styles > Bevel And Emboss properties.
  1. If necessary, enlarge the Timeline panel so that you can see both the Lit marquee and Starburst properties.
  2. Make sure the Opacity property is still visible for the Lit marquee layer.
  3. Click the pick whip icon ( ) for the Depth property in the Starburst layer, and drag it to the Opacity property name for the Lit marquee layer. When you release the mouse, the pick whip snaps, and the Depth property value is red.
  1. Expand the Depth property for the Starburst layer. An expression in the Starburst layer time ruler now reads “thisComp.layer(“Lit marquee”).transform.opacity.” This means that the Opacity value for the Lit marquee layer replaces the previous Depth value (105%) for the Starburst layer.
  1. Drag the current-time indicator from 0:00 to 4:00. Notice that the Opacity value for the Lit marquee layer and the Depth property for the Starburst layer increase simultaneously. The area around the starburst and the marquee light bulbs brighten in sync.
  1. Hide the properties for all layers to keep the Timeline panel tidy. If you enlarged the Timeline panel, return it to its original size.
  2. Choose File > Save to save your project.

About Photoshop layer styles

Adobe Photoshop provides a variety of layer styles—such as shadows, glows, and bevels—that change the appearance of a layer. After Effects can preserve these layer styles when you import Photoshop layers. You can also apply layer styles in After Effects.

Though layer styles are referred to as effects in Photoshop, they behave more like blending modes in After Effects. Layer styles follow transformations in the standard render order, whereas effects precede transformations. Another difference is that each layer style blends directly with the underlying layers in the composition, whereas an effect is rendered on the layer to which it’s applied, the result of which then interacts with the underlying layers as a whole.

The layer style properties are available for the layer in the Timeline panel.

To learn more about working with layer styles in After Effects, see After Effects Help.

Creating the composition – Animating Layers

For this lesson, you’ll use the imported Photoshop file as the basis of the composition.

  1. Double-click the marquee composition in the Project panel to open it in the Composition panel and in the Timeline panel.

Note
If you don’t see the full image, choose Fit from the Magnification Ratio pop-up menu in the Composition window.

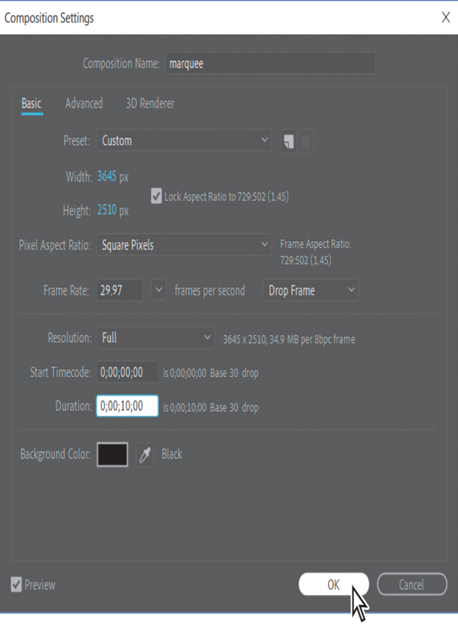
  1. Choose Composition > Composition Settings.
  2. In the Composition Settings dialog box, change the Duration to 10:00 to make the composition 10 seconds long if it isn’t already, and then click OK.

Simulating lighting changes

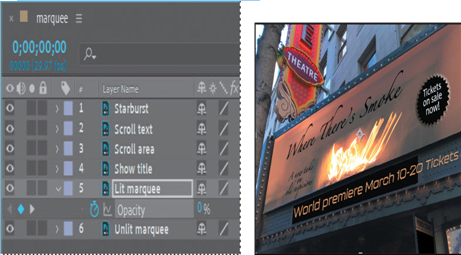
The first part of the animation involves lighting the marquee. You’ll use Opacity keyframes to animate the light.

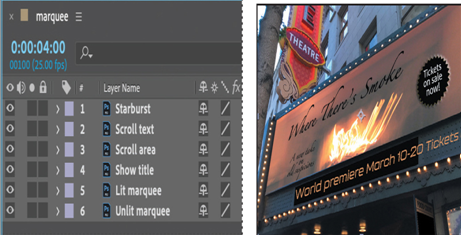
  1. Go to 4:00.

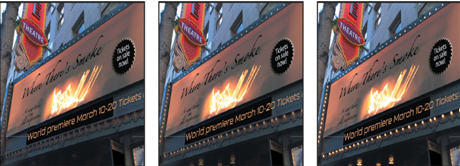
Currently, the lit background is on top of the regular (unlit) background, obscuring it so the initial frame of the animation is bright. However, you want the marquee to appear dark and then lighten. To accomplish this, you will make the Lit marquee layer initially transparent, and then animate its opacity so that the lights appear to turn on over time.

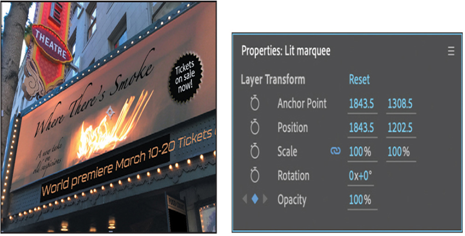
  1. Select the Lit marquee layer in the Timeline panel, and click the stopwatch icon ( ) next to the Opacity value in the Properties panel to create a keyframe. Note that the Opacity value is 100%.
  1. Press the Home key or drag the current-time indicator to 0:00. Then change the Opacity to 0%. After Effects adds a keyframe.

Now, when the animation begins, the Lit marquee layer is transparent, which allows the Unlit marquee layer to show through.

  1. Click the Play/Pause button ( ) in the Preview panel, or press the spacebar, to preview the animation.

The bulbs around the marquee transition until they are brightly lit.

  1. Press the spacebar to stop playback at any time after 4:00.
  2. Choose File > Save.

Importing the footage – Animating Layers

You need to import one source item for this lesson.

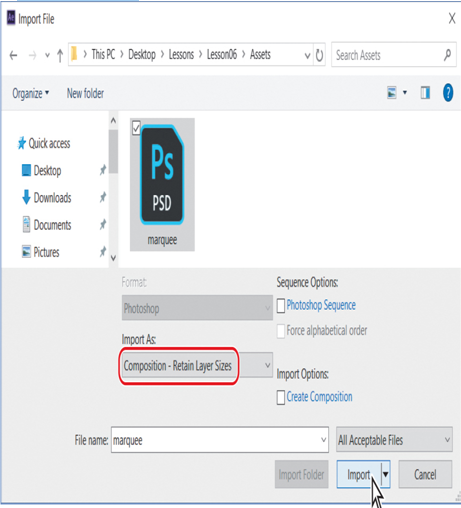
  1. Double-click an empty area of the Project panel to open the Import File dialog box.
  2. Navigate to the Lessons/Lesson06/Assets folder on your hard disk, and select the marquee.psd file.
  3. Choose Composition – Retain Layer Sizes from the Import As menu, so the dimensions of each layer will match the layer’s content. (In macOS, you may need to click Options to see the Import As menu.)
  4. Click Import or Open.
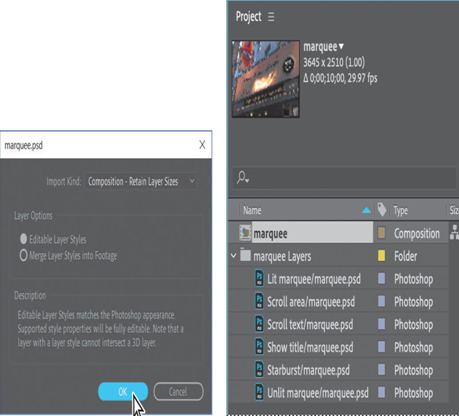
  1. In the marquee.psd dialog box, make sure Editable Layer Styles is selected in the Layer Options area, and click OK.
    Before continuing, take a moment to study the layers of the file you just imported.
  2. In the Project panel, expand the marquee Layers folder to see the Photoshop layers. Resize the Name column to make it wider and easier to read, if necessary.

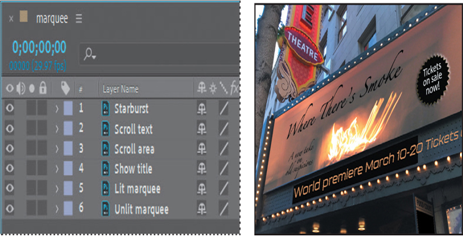
Each of the elements you’ll animate in After Effects—such as the starburst—is on a separate layer. In addition, there is one layer representing the initial marquee with plain light bulbs (Unlit marquee) and a second layer that represents the final marquee with the bulbs brightly lit (Lit marquee).

After Effects preserves the layer order, transparency data, and layer styles from the source Photoshop document. It also preserves other features, such as adjustment layers and type, which you don’t happen to be using in this project.

Preparing layered Photoshop files

Before you import a layered Photoshop file, name its layers carefully to reduce preview and rendering time, and to avoid problems importing and updating the layers:

  • Organize and name layers. If you change a layer name in a Photoshop file after you have imported the file into After Effects, After Effects retains the link to the original layer. However, if you delete a layer in a Photoshop file after you have imported the file into After Effects, After Effects will be unable to find the original layer and will list it as missing in the Project panel.
  • To avoid confusion, make sure that each layer has a unique name.

Getting started – Animating Layers

Lesson overview
In this lesson, you’ll learn how to do the following:
• Animate a layered Adobe Photoshop file.
• Create an expression using the pick whip.
• Work with imported Photoshop layer styles.
• Apply a track matte to control the visibility of layers.
• Animate a layer using the Corner Pin effect.
• View layer render times using the Composition Profiler.
• Use time remapping and the Layer panel to dynamically retime footage.
• Edit Time Remap keyframes in the Graph Editor.

This lesson will take about an hour to complete. If you haven’t already done so, download the project files for this lesson from peachpit.com/AfterEffectsCIB2024, following the instructions in the Getting Started section under “Accessing the lesson files and Web Edition.”

PROJECT: THEATER MARQUEE IN A FILM SHORT
Animation is all about making changes over time—changes to an object or image’s position, opacity, scale, and other properties. This lesson provides more practice animating the layers of a Photoshop file, including dynamically remapping time.

Getting started
Adobe After Effects provides several tools and effects that let you simulate motion video using a layered Photoshop file. In this lesson, you will import a layered Photoshop file of a theater marquee, and then animate it to simulate the marquee lighting up and text scrolling across its screen. This is a stylized animation in which the motion is first accelerated, and then reverses and moves forward again.
First, you’ll preview the final movie and set up the project.

  1. Make sure the following files are in the Lessons/Lesson06 folder on your hard disk, or download them from peachpit.com now:
    • In the Assets folder: marquee.psd
    • In the Sample_Movie folder: Lesson06.mp4
  2. Open and play the Lesson06.mp4 in Windows Movies & TV or QuickTime Player to see the final animation you will create in this lesson.
  3. When you’re done, quit Windows Movies & TV or QuickTime Player. You may delete the sample movie from your hard disk if you have limited storage space.
    When you begin the lesson, restore the default application settings for After Effects. See “Restoring default preferences” on page 3.
  4. Start After Effects, and then immediately hold down Ctrl+Alt+Shift (Windows) or Command+Option+Shift (macOS) to restore default preferences settings. In the Startup Repair Options dialog box, click Reset Preferences.
  5. Click New Project in the Home window.
    After Effects opens to display an empty, untitled project.
  6. Choose File > Save As > Save As.
  7. In the Save As dialog box, navigate to the Lessons/Lesson06/Finished_Project folder.
  8. Name the project Lesson06_Finished.aep, and then click Save.

Adding an audio track – Animating a Multimedia Presentation

Give yourself a hand—you’ve done a lot of animating in this project. But you’re not quite done. You’ll add a soundtrack that matches the lighthearted mood of the video, and fade it out. You’ll also shorten the composition, since the last few seconds are static.

  1. Click the Project tab to bring the Project panel forward. Then, double-click an empty area of the Project panel to open the Import File dialog box.
  2. Navigate to the Lessons/Lesson05/Assets folder, and double-click the Soundtrack.wav file.
  3. Drag the Soundtrack.wav item from the Project panel into the Balloon Scene Timeline panel, placing it at the bottom of the layer stack.
  4. Preview the movie. The music changes just as the canvas flies off the balloon.
  5. Go to 18:00, and press N to move the work area end point to the current time.
  6. Choose Composition > Trim Comp to Work Area.
  7. Go to 16:00. Expand the Soundtrack.wav layer and the Audio properties.
  8. Click the stopwatch icon to create an initial keyframe for the Audio Levels value.
  9. Go to 18:00, and change the Audio Levels value to –40 dB.
  10. Preview the animation, and then save it.

Congratulations. You’ve just created a complex animation, practicing all kinds of After Effects techniques and capabilities along the way.

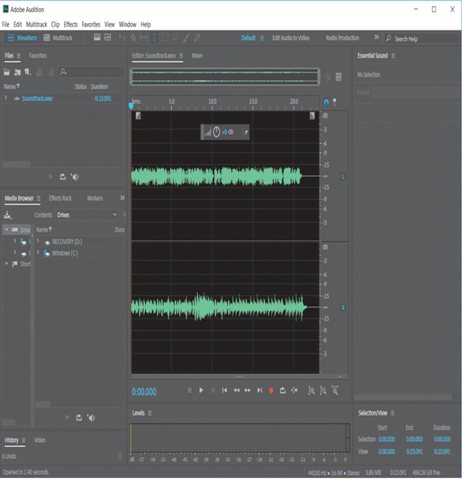
Editing audio files in Adobe Audition

You can make some very simple changes to audio in After Effects. For more substantial edits, use Adobe Audition. Audition is available with a full Adobe Creative Cloud membership.

You can use Audition to change the length of an audio file, alter its pitch, or change its tempo. You can apply effects, record new audio, mix multitrack sessions, and more.

To edit an audio clip you’ve used in After Effects, select the file in the Project panel, and choose Edit > Edit In Adobe Audition. Then, make your changes in Audition, and save the file. The changes you made are automatically reflected in your After Effects project.

Review questions

1 How does After Effects display an animation of the Position property?

2 What is a solid-color layer, and what can you do with it?

3 What types of audio can you import into an After Effects project?

Review answers

1 When you animate the Position property, After Effects displays the movement as a motion path. You can create a motion path for the position of the layer or for the anchor point of a layer. A position motion path appears in the Composition panel; an anchor-point motion path appears in the Layer panel. The motion path appears as a sequence of dots, where each dot marks the position of the layer at each frame. A box in the path marks the position of a keyframe.

2 You can create solid images of any color or size (up to 30,000 x 30,000 pixels) in After Effects. After Effects treats solids as it does any other footage item: You can modify the mask, transform properties, and apply effects to the solid layer. If you change settings for a solid that is used by more than one layer, you can apply the changes to all layers that use the solid or to only the single occurrence of the solid. Use solid layers to color a background or create simple graphic images.

3 You can import any of the following types of audio files into After Effects: Advanced Audio Coding (AAC, M4A), Audio Interchange File Format (AIF, AIFF), MP3 (MP3, MPEG, MPG, MPA, MPE), and Waveform (WAV).